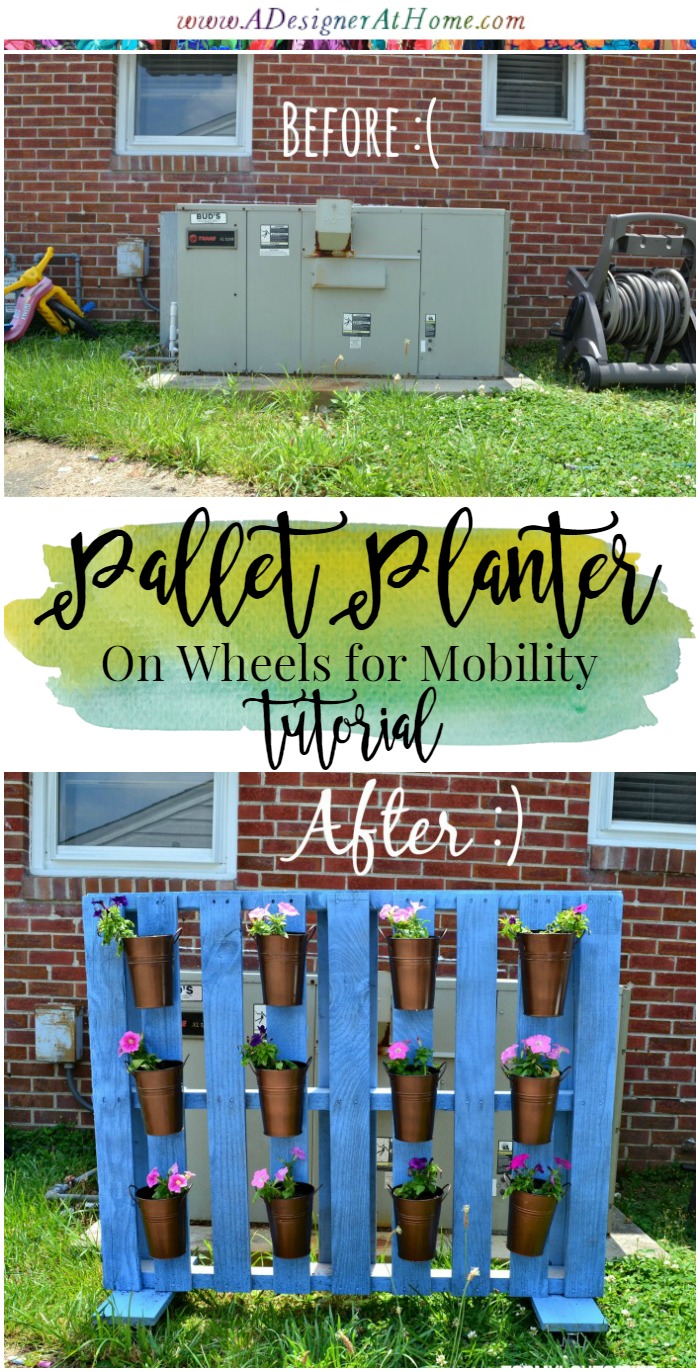

I want to share with you the tutorial for my rolling pallet planter as part of the Perfect BBQ Blog Hop! So you’ve got delicious food, and the cutest table setting. The decorations are up and you’re taking a seat to absorb it all in. As you look around you notice your big fat air conditioning unit is right there. How can you possibly enjoy all that great food and great company with that ugly hunk of metal staring at you? Don’t let this be you.
OK, so your BBQ isn’t anywhere near your air conditioning unit. I get that. How about unsightly trash cans? There’s definitely something to be camouflaged. And it doesn’t get much better than cute camouflage on wheels!
You’ll love how this pallet planter will look in your space. In any space!
What You’ll Need
Spray Paint, Pallet, 2 locking swivel wheels, 2 swivel wheels, metal buckets, screws, scrap wood.
How Long It Takes
Less than 1 hour!
Pallet Planter On Wheels Tutorial
You’ll want to be sure you’ve got a sturdy pallet. It can be aged, I let my age outdoors for the past few months so that the paint will get chippy easy without any additional work on my part. But, the pallet itself shouldn’t wobble.
Spray your favorite color spray paint all over each visible side. It helps to lay it out onto a large drop clothe so that you don’t have to maneuver it any. With it being as hot and sunny as it is here in Virginia, the paint dried within minutes so I filled in any patches immediately.

Lay out cute metal buckets. I picked up these adorable copper buckets at the dollar tree last summer, but have seen them this summer too! It’ll depend on how many planks your pallet has as to how many buckets you’ll need. I spaced mine out 1 plank in between with 3 rows. That gave me 12 buckets.
We get so hot in the summer that I intentionally opted not to drill holes into the bottoms of the buckets, but it’s something you can do if you’ll need to!

Using my new *Ryobi Drill (the one I won in the Creating With The Stars Upcycle Link Up) I drilled screws through each bucket and into the wood behind it. I had no idea what difference it made to be using a good drill. It was butter, guys.
I had hubby cut the scrap wood with a circular saw. I estimated about 4 times the depth of the planter for the length of the pieces of wood the wheels would screw into. It needs to be longer to balance out the heavy face of the pallet once dirt and water are in those buckets.

After a quick spritz of spray paint, I used the drill again to attach the wheels with screws.

Being careful, flip the pallet upside down. Drill the scrap wood to the pallet, leaving slightly more of the piece on the side with the buckets (again, to help balance out those heavy pots).

Don’t laugh, but I couldn’t find washers and my screw heads were too small for the holes of the casters. Those are picture hanging tabs leftover from another project. I wasn’t about to make another trip to the hardware store this week.
Flip the pallet back over and onto it’s wheels. You can put any plant that will love wherever your pallet will be housed. I found a great 12 pack of multi-hued petunias for $9.98 at my Lowes. They love lots of son!
Let’s see this bad boy in action!


And how about that air conditioning unit? Yup.. we have a BEAST.


It’s fantastic! Don’t forget to “hop” on over to the other projects to complete your Perfect BBQ!


Love this! Such a fun and pretty way to add some color to a party (and cover up a potential eye sore.) Great job!
Corinna, this is brilliant! I love that splash of blue against those pretty potted flowers as well. And how cool is the rolling part of this planter? Totally awesome!
You’re a total genius!! What a perfect way to cover up all those ‘lawn warts.’ Thanks for bringing the brains and pretty-ness to the BBQ party!
Much love,
Trisha D.
this is genius! I love that it rolls, so smart!
This is so, so smart, Corinna! I need one for inside my house! I’d just wheel that baby in front of my laundry pile. 😉 Thanks so much for doing this with me, friend!
Great idea! I need one of these to roll in front of my entire house.
Great project, Corinna! I can definitely think of lots of things I could hide with that! Thanks so much for the tutorial! Enjoy your week!
~Abby =)
What a smart and adorable idea!
This is such a smart idea! I’d love if you’d link up to The DIY’ers! http://homecomingmn.blogspot.com/2014/06/the-diyers-6.html
So cute! I love the blue. This is exactly my kind of project – I can’t wait until we have a yard again soon!
Stopping by from Merry Monday’s…I love this idea. So cute and looks simple too! I would love it if you could stop by Wonderful Wednesday’s Blog Hop and share. The party starts at 7pm EST. Hope to see you there!
Blessings,
Shari
Thanks so much for linking up to the Merry Monday Link Party! I love the idea of being able to use this to get plants more sun, while still covering up crap no one wants to see. Not that I have ANY of that around my house… Hope to see you next week!- Treana @ houseofbennetts.com
Corinna, What a beautiful idea!! So great. This would work especially to hide some things in the yard, and then you can move it for the winter! Great idea and darling colors!